Have you seen The Beatles’ Abbey Road album cover and wondered where Ringo and the crew are going? The new Adobe Photoshop feature, Generative Fill, lets you expand the subject of your images, showing what the picture borders did not capture. As a result, the photo-editing program opens new creative opportunities for photographers and artists.
Picture-takers could expand a lackluster image to improve how it looks in post-production. Meanwhile, artists could create new backgrounds for existing images, letting them expound a larger world around their subjects. Of course, casual users have a new way to play and experiment with Adobe Photoshop!
This article will discuss how to use Generative Fill. Later, I will suggest tips on how to maximize this AI feature. You must have the latest Photoshop (beta) app version to use this function. You can download it for free on the Adobe website.
How to generate objects and backgrounds
- Select an object in your image via the selection tool.
- Next, click the Generative Fill button in the contextual taskbar. Alternatively, select the Edit and Generative Fill options from the application bar. Also, you may right-click a selection and pick the AI feature.
- Describe the object or scene you want to produce in your image in the prompt box. On the other hand, leave it empty to let Photoshop fill the selection based on its environment.
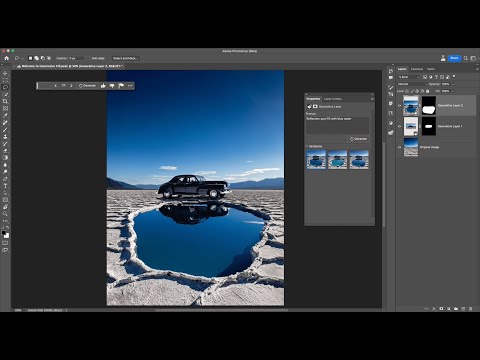
- Afterward, click the Generate button to make a new Generative Layer in the Layers panel.
You may also like: How To Create An Apple ID Account
The separate layer keeps your original image untouched, letting you undo changes easily. Moreover, you may create more to test numerous AI-generated objects by repeating the above instructions.
You can produce variations by modifying an existing layer’s prompt box and clicking the Generate button. Then, open the Properties panel and click on the thumbnail preview to view the results. You may also create new backgrounds with Generative Fill:
- Use the Selection tool to choose your subject’s background.
- Next, pick the Select and Subject options.
- Click the Select and Inverse options.
- Follow steps 2-4 from earlier.
How to extend images and remove objects
Extend the canvas of your picture, select the empty area, and apply Generative Fill. Using it without a prompt will produce a seamless extension of your image.
- Click the Crop tool from the toolbar to reveal crop borders on the edges of your picture.
- Next, drag the corner and edge handles outward to widen the canvas.
- Press the Enter or Return key or the commit checkmark in the Crop options bar. These will confirm your new canvas size. Also, the canvas uses your background color by default.
- Then, use the rectangular Marquee tool to choose the extra canvas. Click and drag to make your selection.
- Follow steps 2-4 from the “How to generate objects and backgrounds” section.
You can remove objects by selecting them, leaving the text-entry box blank, and clicking the Generate option. In response, Adobe Ai will fill that selection based on its surroundings.
Generative Fill Tips And Tricks
This new Adobe AI feature requires text prompts, so you must know how to write them properly. Use simple, direct language with three to eight words, a subject, and descriptors.
Write what you want to see and ignore redundant commands like “add” and “remove.” Also, check out my guide to writing effective prompts for more information.
You may also like: How To Try The Android 14 Beta
Modify AI-generated results on the Generative Layer to protect your original image. Moreover, duplicate them if you want to improve a specific AI-produced layer.
Leave enough pixels in the original picture to extend it. Generative Fill requires enough reference material to produce seamless, high-quality results.
Conclusion
Generative Fill is Adobe Photoshop’s latest feature, using artificial intelligence to expand images. As a result, you can do more with your pictures.
Aside from the Photoshop beta version, you need a computer with at least 8GB of RAM. You can improve the photo-editing app by installing larger-capacity RAM modules.
Alternatively, you can replace your computer with a more powerful PC. Learn these computer tips and more by following the latest trends at Inquirer Tech.
Frequently asked questions about Generative Fill
How do I get the Photoshop (beta) app?
You may download the beta app on the official Adobe website and the Creative Cloud app. Open the Beta apps tab of the latter and select the Install option next to Photoshop (beta). Next, ensure it has the latest updates. Open the Creative Cloud Updates tab and select the Check for Updates option.
Why can’t I access Generative Fill?
Ensure you are using the Photoshop (beta) app and you’re 18 years old. Also, you must have a Creative Cloud Individual license under the CC Teams, CC Enterprise, and Educational tiers. Hovering over the Generate button will explain why you can’t use Generative Fill. Also, you can’t use it if you’re in China.
Why is the Generative Fill button grey?
If you’re below 18 years of age, the Photoshop (beta) app will grey out Generative Fill, preventing you from using it. Update your Date of Birth by signing out and into the Photoshop (beta) and Creative Cloud Desktop apps. Then, log into Behance with your Adobe ID and enter your Date of Birth.